Time and date
CONSTRUCTION DIRECTORY
Wykamol Group
Stitched up!
High-quality retrofit reinforcement bars from Thor Helical mean Wykamol can now offer peerless protection against masonry cracks.
On the off chance there are builders out there who aren’t struggling with their workload in these days of skills shortages, it might be worth them looking for business in areas where lintel or arch failure are taking place or fracking-induced ground movement is expected to take place.
Because if sales of crack stitching kits in such areas are anything to go by, chances are there are a multitude of properties at risk of showing signs of suffering from the fracking process. And unless cracks are caused by subsidence they are unlikely to be covered by insurance which means the householder or property owner will be looking for a builder to repair them.
Thor Helical crack stitching bars are produced using a patented process that ensures consistency of tensile strength (others brands can vary within any batch). They are used widely to strengthen cracks in walls as long as the cause – changes in thermal or moisture content, shrinkage or a change of windows for example – has been resolved. If not then the client needs a structural engineer rather than a builder.
The system is suitable for use with any masonry construction – brickwork, stonework or blockwork – and is quick and easy to install – taking as little as half a day to install (for 10 bars), obviously more if the cracks are at a high level and scaffold is required.
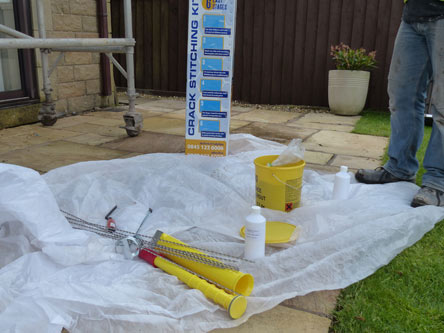
The crack stitching kit contains everything needed for professional wall stitching repairs, including 10 lengths of 6mm x 1m (8kN+) stainless steel helical crack stitching bars, a tub of grout, a grout applicator with high-flow nozzle, and a mixer paddle and finger trowel.
Installation is as follows:


- Step 1: Rake out mortar joints at 300mm to 450mm vertical centres. The slots should extend 500mm either side of the fracture.
- Step 2: Using clean water, flush the slot to remove loose debris and dust (this also helps to sufficiently wet the wall to take the initial suction from the masonry).
- Step 3: Prepare the mortar by emptying the powdered components of the grout into the mixing bucket and adding the liquid from the bottles. Mix together using the powered paddle for at least 90 seconds or until the grout forms a creamy consistency, then carefully pour the mixture into the applicator gun.
- Step 4: Use pliers to adjust the width of the applicator nozzle to suit the height of the pre-formed slot. Insert the applicator nozzle into each slot and using the plunger-like handle, gently fill the slot with a generous bead of grout approximately 20-25mm deep. Work from one end to the other and fill two slots at a time before introducing the crack stitching bars.
- Step 5: Gently push the reinforcement bars into each slot, ensuring they are embedded approximately halfway into the grout so the displaced mortar exudes around the helical troughs to encapsulate it. Use the finger trowel to “iron” the excess grout, compressing it against the reinforcement so the grout is recessed enough to allow the slot to be re-pointed.
- Step 6: Re-point cracks and slots using mortar to match the existing structure.
That’s it, stitching brickwork in six easy steps!


